Tutorial 1: Steady-State Current Injection in a Single Cell
Overview
This tutorial demonstrates the simplest example of applying steady-state current injection to a single biophysical neuron.
See also
Corresponding BMTK tutorial: Tutorial: Single Cell Simulation with Current Injection
Changes from bionet to bionetlite
Only the import statement needs to be changed. All other code remains exactly the same.
Before (BMTK):
from bmtk.builder.networks import NetworkBuilder
After (bionetlite):
from bionetlite import NeuliteBuilder as NetworkBuilder
Code Example
from bionetlite import NeuliteBuilder as NetworkBuilder

# Create network
net = NetworkBuilder('mcortex')

# Add a single biophysical neuron
net.add_nodes(
    N=1,
    pop_name='Scnn1a',
    model_type='biophysical',
    model_template='ctdb:Biophys1.hoc',
    dynamics_params='472363762_fit.json',
    morphology='Scnn1a_473845048_m.swc'
)

# Build the network
net.build()

# Save to files
net.save_nodes(output_dir='sim_ch01/network')
Generated Files
The following files are generated in this simulation:
<network_name>_population.csv
A file containing population information that defines the biophysical properties of a single neuron.
id,pop_name,model_type,morphology,dynamics_params,...
0,Scnn1a,biophysical,Scnn1a_473845048_m.swc,472363762_fit.json,...
<src>_<trg>_connection.csv
A file containing synaptic connection information. Since no synaptic connections are defined in this tutorial, the file is empty (header only).
Note
A connection file is required to run the Neulite kernel. If no connections exist, an empty file is generated.
Processed SWC File
A preprocessed morphology file for Neulite is generated.
This file is processed according to the Perisomatic model and the following modifications are made:
Replace actual axon morphology with a simplified artificial axon
Convert to zero-based indexing
Sorting by depth-first search
Note
For details on the Perisomatic model, see Specifications and Limitations.
Files Generated by Neulite
bionetlite generates files in the following directory:
If
base_diris set in the script:{base_dir}_nl/If
base_diris not set:neulite/
Directory Structure
sim_ch01_nl/
├── mcortex_population.csv
├── mcortex_mcortex_connection.csv
├── kernel/
│   └── config.h
└── data/
    ├── Scnn1a_473845048_m.swc
    └── 472363762_fit.csv
mcortex_population.csv
A population file for Neulite. The column structure is as follows:
#n_cell,n_comp,name,swc_file,ion_file
1,3682,default_100_100,data/Scnn1a_473845048_m.swc,data/472363762_fit.csv
#n_cell: Number of cellsn_comp: Number of compartmentsname: Population nameswc_file: Path to SWC morphology fileion_file: Path to ion channel parameter file
mcortex_mcortex_connection.csv
A connection file for Neulite. Since there are no connections in this tutorial, a file with only the header is generated:
#pre nid,post nid,post cid,weight,tau_decay,tau_rise,erev,delay,e/i
kernel/config.h
A compilation-time configuration file for the Neulite kernel. It is automatically generated from BMTK’s config.json:
// Automatically generated by bionetlite

#pragma once

// Simulation parameters
#define TSTOP ( 2000.0 )
#define DT ( 0.1 )
#define INV_DT ( ( int ) ( 1.0 / ( DT ) ) )

// Neuron parameters
#define SPIKE_THRESHOLD ( -15.0 )
#define ALLACTIVE ( 0 )

// Current injection parameters
#define I_AMP ( 0.12 )
#define I_DELAY ( 500.0 )
#define I_DURATION ( 1000.0 )
This file contains the following parameters:
TSTOP: Simulation time (ms)DT: Time step (ms)INV_DT: Number of steps per millisecondSPIKE_THRESHOLD: Spike detection threshold (mV)I_AMP: Amplitude of current injection (nA)I_DELAY: Current injection start time (ms)I_DURATION: Duration of current injection (ms)
Note
Since config.h is used when building the Neulite kernel, recompiling the kernel is necessary if you modify this file.
Building and Running the Neulite Kernel
Step 1: Deploy Kernel Sources
Copy the contents of Neulite’s kernel directory to the kernel directory generated by bionetlite. Exclude config.h as it has already been generated by bionetlite:
rsync -av --exclude='config.h' /path/to/neulite/kernel/ sim_ch01_nl/kernel/
Step 2: Build the Kernel
Navigate to the kernel directory and build. config.h has already been generated by bionetlite:
cd sim_ch01_nl/kernel
make
Step 3: Place the Binary
Copy the built binary file nl to the parent directory:
cp nl ../
Step 4: Run the Simulation
Navigate to the directory generated by bionetlite and run the simulation:
cd ..
./nl mcortex_population.csv mcortex_mcortex_connection.csv
Simulation Result Files
The following text files are generated after running the Neulite kernel:
s.dat - Spike Time Data
Space-delimited text format recording one spike event per line:
Time(ms) NeuronID
125.3 0
156.8 0
189.2 0
Column 1: Time at which spike occurred (ms)
Column 2: ID of the neuron that generated the spike
v.dat - Membrane Potential Data
Space-delimited text format recording membrane potential of all neurons per line:
Time(ms) Neuron0_Vm Neuron1_Vm ...
0.0 -65.0 -65.0
0.1 -64.8 -64.9
0.2 -64.6 -64.8
Column 1: Time (ms)
Column 2 onwards: Soma membrane potential of each neuron (mV)
Note
These files are in text format (ASCII), so they can be easily loaded with Python’s numpy or pandas.
Comparison of Execution Results with BMTK
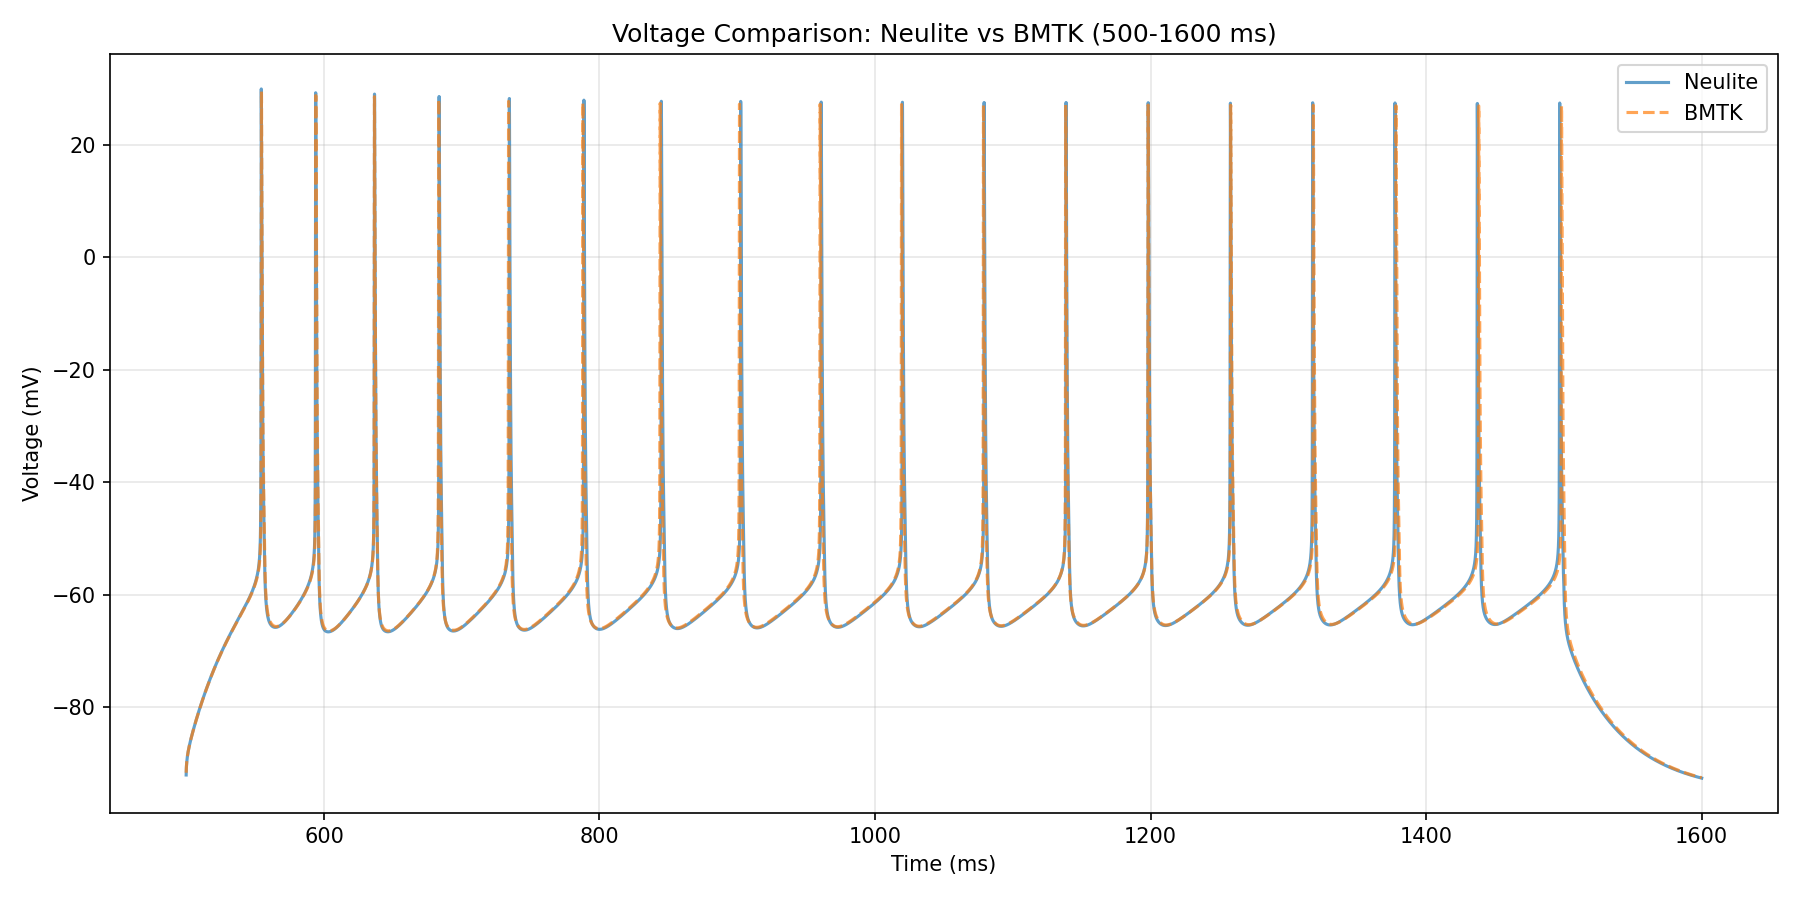
Comparison plot of execution results between BMTK and Neulite at dt=0.025.
Next Steps
Tutorial 2: Spike Input Simulation - Simulation using spike input
Basic Usage - More detailed usage instructions
Note
Complete code examples and data files for this tutorial are available in the examples directory of the repository.